Wednesday, August 27, 2014

How Do I Do Class Dojo?

    During the 2013 school year, I became a Class Dojo mentor. Since then I've had a lot of teachers asking me how I use Dojo in my classroom. In previous posts I shared the app basics and the reward system that I have created to correlate with it. Let me outline, specifically, my Dojo procedures...

In the Beginning...   
Week One: I enter the students into a new class and print off sheets to send home to parents that will show them how to connect with their child's Dojo account. 
Before I began using Dojo, I also download the Class Dojo app onto my iPod and iPad. Then I bookmark the website on my classroom laptop so I can quickly connect everyday. This laptop is linked to my Promethean Board so I leave Dojo on when I'm not using the board for instruction. This is a great motivator because it is synced with my other devices! That means if I'm walking around the room giving Dojo points on my iPod, it will also pop up on the board in the front of my room. 
The students get instant feedback and I get better classroom behaviors! 

After I set up my new class(es) for the school year, I import my behaviors from last year. 
*You'll only need to do this is you used customized behaviors from a previous class.


Once my new class is created and I'm ready to begin using Dojo,
I show the students the following video clip.


Building Student Buy-In
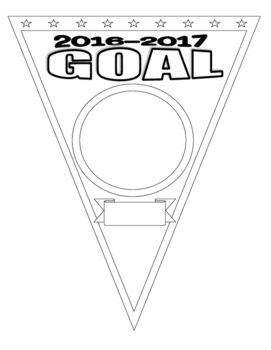
Class Dojo also provides the perfect opportunity to work on student goals for the year. We do several lessons about setting goals and doing our best during the first week of school.
This system correlates perfectly!


Getting Parents On the Team
It's also important to get the parents involved!
Dojo is a fantastic communication tool that is constantly improving!
As soon as you log into your account, you can see how many parents have connected to your classroom.
Click on the "Parent Accounts" tab on the Reports Screen. 
This will let you see all of your individual students and who's connected.
 After the first day, 14 of my 23 students have a parent who has connected to their child's account.

This student's parent has connected. I can view the parent's email that is connected to the account and the dates that he checked his child's progress.

You can invite parents who have not connected to do so via email, phone message, 
or another printed parent sheet.

Once most of my parents are connected, I use this regularly to communicate with them.
Dojo allows you to send whole class and individual broadcast (IMs) to parents at anytime during the day. This is really convenient since we're constantly connected to Dojo during the day, and parents can check their child's progress anytime.

What's the Point of Points?
     Children naturally want to feel like they've done a good job. Gaining points gives students a sense of accomplishment. More competitive students will also work hard to stay at the front of the race for points. They also love to be rewarded extrinsically! I created a set of classroom reward coupons that students can "buy" with their points.  


      My students accumulate points for the entire month. At the end of that time, my students can "buy" any coupons that they can afford. Students with a large number of points can buy multiple rewards. 
Right now there is no way to deduct a specific number of points from a student's account, which is why I tell students to buy all the rewards that they want and can "afford". I allow students to use their coupons whenever they choose (however they have to let me know at the beginning of the day that they will be doing so). After my students have finished shopping I reset all of the student points for a new month. 

   I also give my students a class reward at the end of the month if our class average is at least 85% positive. 

I try to keep my rewards inexpensive and/or free since this is a (hopefully) recurrent incentive.
The class rewards sheet is displayed on our Promethean Board screen. Then I give each student a sticky note and everyone in the class votes on their top choice. 
Then I post the top 2-3 choices in a poll on our class Edmodo page for the students to cast their final vote. 
The reward with the highest number of votes wins!

Using Student Reports for Management
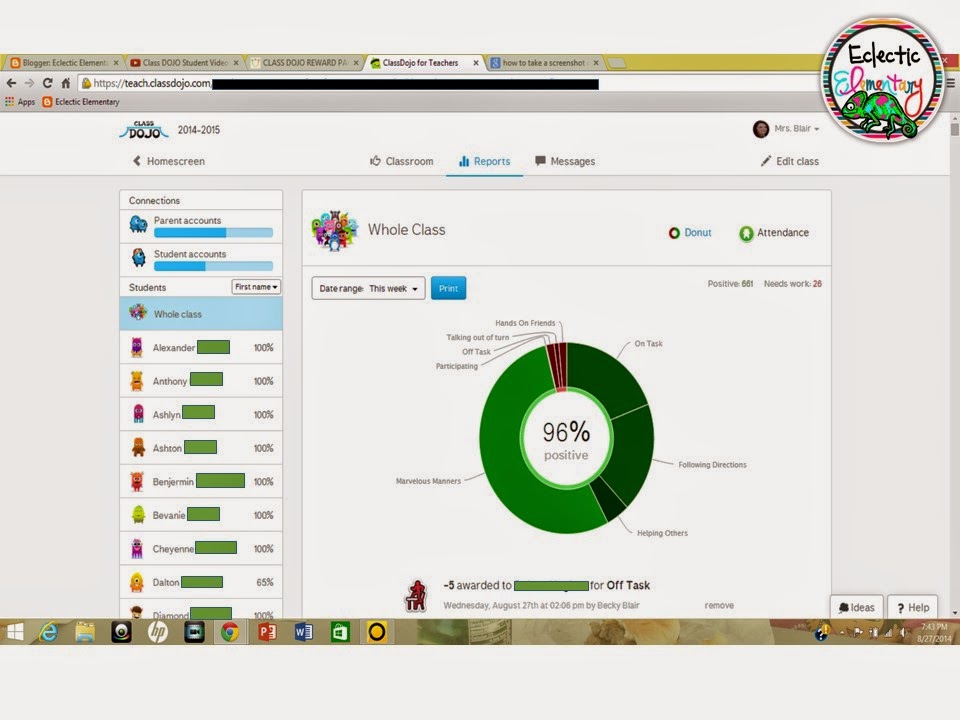
    Individual student reports can also be invaluable for classroom management tools. Earlier in the post I mentioned using Dojo to help students set personal goals for the classroom. You can access student reports at anytime during the day. These reports give you a cumulative percentage for positive student behavior inside the "donut". It also shows a breakdown of positive and negative behaviors by name. This specific info will help you and your students focus in on areas of concern, as well as areas that they are excelling in. 
   Sometimes you may need to look outside your classroom for help with some students due to behavioral issues. Since Dojo tracks each student, you have a detailed breakdown of each student's behavior throughout the course of the day. In the event that you need documentation for a behavioral referral, simply print off an individual student report. You can select one day, or a date range, to look for ongoing behavioral issues. This will save you an immense amount of time and energy! No more spending valuable time trying to document and record behaviors. Just print and go (or attach to your other paperwork ;D)
    I hope this little tutorial helps your classroom run more smoothly this year! I'd love to hear your ideas for implementing Class Dojo in your classroom. 

Thanks for stopping by,
 photo signature-37.png

Sunday, August 24, 2014

Amazing Grace & Goal Setting For a New Year

  Everyone always spend a large portion of the first week of school teaching their new students classroom procedures and expectations. This is also the perfect time to talk about and set some goals for the upcoming school year. In the past I've let my students choose a school-related goal for the classroom OR a personal goal that they would like to achieve. You can emphasize whichever you'd prefer.
   
This year we're going to use the story "Amazing Grace" as a Read Aloud to 
springboard into goal-setting for the new school year. 
In this story Grace's teacher announces that the class will be performing "Peter Pan". Grace is very enthusiastic until her classmates tell her that she doesn't fit the part. 
In the end, Grace learns the importance of believing in herself and following her dreams.

   Before you begin reading, show your students a little teaser 
and ask them to make predictions about what might happen in the story...


     Then read the story aloud to your class (this is a pretty popular book series so you can most likely find it in your school and/or local library).  Afterwards, discuss the obstacles that Grace faced during the story (ex: She is a black girl and Peter Pan has traditionally been portrayed as a white boy). Ask the students to describe how this obstacle isn't related to her ability to dance or perform. Then let the students describe how Grace persevered until she reached her goal. 
   Next ask students to reflect on what they can achieve if they show perseverance (continuing in a course of action despite obstacles or discouragement). If you teach younger students you may want to spend a few minutes creating a list of ideas for students who may need extra support. Distribute a copy of the goal pennant to each student and ask them to write their goal on the back of the pennant. They will also make a list of things that they can do to achieve their goal. Ask the students to leave the reflection section blank.
Goal Pennant

   Once students complete the writing portion, they can turn the pennant over and start adding some color. Students should draw and color a picture of their goal in the center circle, and write their name on the ribbon. The rest of the pennant should be as colorful as possible. When everyone's finished we hang our pennants on a string across the top of one wall in our room. Every time the students see their pennants, it will remind them of the goal they set for themselves. 
   Periodically during the year, ask students to discuss how they're progressing on their goals. At the end of the school year, take the pennants down and give them back to the students. In the blank reflection section, let students briefly reflect on how much they achieved during the school year.

Follow me for more ideas and freebies!

Thanks for stopping by,

 photo signature-37.png

Saturday, August 23, 2014

How I Spent My Summer Vacation

  Everyone LOVES to share their stories of summer adventure, especially children! Take advantage of their excitement of all things summer to pick up a quick BOY (Beginning Of the Year) writing sample...

    During the first couple of days of school, pick up the book "How I Spent My Summer Vacation" by Mark Teague. This isn't a new book so you can probably find it at your school or local library (although I'd recommend getting one of your own to create a BOY tradition). Or, if you're bent on showing off your tech-savvy side, you can play the story online for your students to enjoy.


  After you've lassoed your students with tales of summer fun, rope them into writing tales of their own! If you teach younger students, work as a class to brainstorm a list of things that students did over the summer. Older students could brainstorm in small groups or individually. 

Use a cowboy theme to match the book...
or use a fun summer themed sheet.
Click on either image to download 
"How I Spent My Summer Vacation" writing sheets.

   Then give your students the reins and let them beginning writing about what they did during summer vacation. I try not to give too much guidance during this writing activity since I'm trying to determine the students' writing abilities. After their story is complete you can ask them to create illustrations to compliment their writing piece if you like.
   When the students finish, I give each one a file folder label to stick on the upper right corner of the page (when I'm prepping my lesson materials, I will print a full page of file folder labels with "BOY Writing Sample" and the date I'm planning to complete the activity). These writing pieces are saved until the end of the year so the kids can see how much they're writing skills have grown from the beginning of school.

Here are some other beginning of the year ideas for you to check out:
Classroom Management With Class Dojo
Ready, Set, Go!
Owl-Fully Cute Open House
 photo signature-37.png

Tuesday, August 12, 2014

Back to School Book Challenge

    Forget about boring book reports and mundane multiple-choice tests that just leave your students dreading reading time. Give them something more motivational with the Book Challenge Packet! 
    A couple of years ago, I ditched the AR(Accelerated Reader) system in my classroom because in my heart I was convinced that it was causing my students to hate reading. A few students loved the competition of the system, but they were still reading for all the wrong reasons. It was my goal to instill a love of reading in the students who came through my classroom. I read, and reread, Lara Candler's Power Reading Workshops and The Book Whisperer by Donalyn Miller. Then I started shifting how I taught and assessed my students' reading. 


  Last year, my students completed the 40 Book Challenge with reading logs and parent sign-off sheets. This year I decided to make it a little more interesting with the Book Challenge Pack! Instead of merely having students write reading summaries, students will engage in meaningful, skill building activities that relate to the text that they are reading.
   Each quarter students will receive a packet of nine challenge activities. I also send an email copy to all of my parents AND post the document on my class Edmodo page (for those kids who seem to lose every document that wanders into their backpacks). Each challenge packet will be housed in an orange 3-prong folder (I picked up a class set at Walmart for just a few dollars). The bright color will be easy for the students and parents to keep track of.  
    The packet includes activities for fictional and non-fictional texts. The first packet features more activities for fictional texts. This allows students the time to become more familiar with non-fiction text features as the year progresses. In third grade students begin reading learn instead of learning to read. Students should be fluently reading and understanding both types of text by the end of the year. As the year progresses, the students move into more challenge activities for non-fictional texts.
       Last year I asked my students to leave all their activities together until the end of each quarter. But to be honest, several students always lost their work and I had a mountain of work to assess in a short period of time. This year I will ask my kids to turn in one activity per week. At the end of each quarter the students' folders will be refilled with their new 9 Week Choice board and the matching activity sheets. 
 
The students will choose one activity to complete each week.
When they're finished, they will record their info on the challenge sheet.
At the end of the week the students will return their Book Challenge folder with the 
completed challenge sheet and matching activity.

 The packet includes a homework choice board, and a matching student direction board, for four quarters. I copy these sheets front to back and make one set of activity sheets for each student. Then my students will complete one book challenge each week as homework, or as a classroom activity, to increase their reading comprehension skills. 

The Book Challenge Packet includes the following printable activities:
  • Fiction Book Summary
  • Decoding Characters
  • Character Comparisons
  • Character Maps
  • Book Report (Fiction and Informational Text)
  • Non-Fiction Book Summary
  • Thinking Stems (2 Versions)
  • Making Connections (Fiction) Flipbook
  • An Important Detail
  • Making Connections (Informational Text) Flipbook
  • Story Summary Flipbook
  • Non-Fiction KWL
  • Story Elements Flipbook
  • Character Trait Inferences
  • Book Favorites
  • Who's Who? (character analysis)
  • Vocabulary Memory Game
  • What's What? (topic analysis)
  • 9 Pick Your Project Options
       My student homework folders are always due on Friday. I will be able to quickly check over each student's work and return the folders on Monday morning so they can begin working on their next activity.  Besides the Book Challenge, my students also complete Spelling Choice Boards for homework (more on these later!).
    These routine homework assignments have really helped me streamline paperwork and cut back on the stress of constantly reinventing the wheel. My students enjoy the activities because they have more control over what they read and how they extend their thinking. I also know that they know and understand the expectations required to complete the assignments because I've modeled them in class, which allows them to be more successful. It also helps parents more easily stay on top of their child's homework since they know exactly what will be coming home each week.
   If you're interested in challenging your students to enjoy reading again, click on one of the images above. It will lead you to the download for my Book Challenge Packet.

Thanks for stopping by!
 photo signature-37.png

Monday, August 11, 2014

Back To School Parent Pack

  Like every other teacher I know, I had a mile long list of summer projects to complete. Of course, I got distracted working on school things instead of cleaning out my shed (darn it!) ;D This week I've been working on some back-to-school essentials.
  Everyone always spends a large amount of time making their room look cute and inviting. Of course you want the parents and students to enter your room feeling positive about the start of the new school year. But, you also need to make sure that your organizational system is as put together as your classroom decor.
  One of the first things my TA, Patty, and I work on before school starts is parent packs. These are the stacks of paperwork that parents are generally required to complete at the beginning of the year. Most of the documents will be provided by your school/county, but I also include a few items for my personal classroom. Since the parents get tired of working their fingers to the nubs rewriting info a million and one times (I know, I have three kids of my own!), I tried to create some forms that would keep them a little more interested.

You can print a cute cover if you'd like...

Inside the packet are the following forms...
To save paper, double-side copy these forms. 
Then hole punch them and put them in a thin binder (or 3 prong folder) for easy access.
I also separate my students with tabbed dividers (I'll upload a photo when I get back to school)!
I store mine right next to my phone. 

The next two forms can go in the same binder, or you can create an individual file folder for each student.
I like to keep mine in the binder with my parent contact sheets so I can quickly thumb through the info. 
The survey should be completed by a parent!

   This can be sent home with other paperwork that your school/county requires or you can ask parents to complete it while they're visiting for their first Open House. Since our school hosts and Open House the week before school starts, I always give this to parents when they come to meet me for the first time. Sometimes I offer a fun incentive to students who can get their parents to complete and return their packets on the first day of school. 
   If you would like a free copy of this little resource, please click on any of the images above.
Enjoy & Thanks For Stopping By!

 photo signature-37.png

Saturday, August 2, 2014

Get Your Organization Rolling

   Last year I wanted to provide some organization for my students' table groups. Originally, I had planned to use stack-able crates turned on their sides to create shelves between the student desks. But, before I got those put together, I stumbled across these little rolling carts while I was wandering through Target.
They're compact, easily movable, and fairly inexpensive. These were on sale for $9.99! 
You can also find them in black, purple, or blue for a couple of dollars more.
Since I wanted to customize these with colors that matched my groups, I opted for plain white carts with clear drawers.

You can leave your drawer fronts clear if you prefer, but it's super simple to give them a colorful upgrade.

Materials You'll Need to Customize Your Drawer Fronts:
  • Scrapbook Paper (I used 15 sheets of 12"x 12")
  • Double-sided tape (or loops of regular tape if your in a pinch)
  • Paper Cutter
  • Ruler
  • A lamination machine 

Prep Work:
  1. Choose Your Paper: Since I already had a pile of scrapbook paper in my room (that I never got around to using at home), I started by choosing several prints in the same color family so each cart would match my table groups. You can also make each drawer the same print if you want to save paper. 
  2. Bring on the Heat! My wonderful media center assistant at my school zipped my sheets through the lamination machine (Thanks Sheila! :D), but it's easy as pie to run the sheets through in a few minutes. After the sheets are laminated, slice them apart with a pair of scissors (or ask a parent volunteer to do it for you if you're strapped for time).
  3. Measure Twice; Cut Once: Use a ruler to measure the front of one drawer (don't forget to measure the height and length). Use your paper cutter to trim down the sheet to fit the drawer. Before you cut the rest of your sheets, slide the sheet into the drawer to check the fit! If it slides in easily, use the first sheet as a template to quickly cut out your remaining drawer fronts.
  4. A Little Sticky: Now that all your drawer fronts are trimmed to perfection, pull out the double-sided sticky tape (I like this less permanent adhesive so I can switch out the fronts if I change my room theme/color scheme). Apply the tape to the print side of the decorative sheet for each drawer. I hit each corner and multiple spots in the middle (let's face it; the kids are rough on everything) to give it more sticking power. Then, carefully slide the taped front down into the drawer and press it against the plastic so the entire sheet is well adhered. Repeat with each drawer. 

When you're done, the rolling cart should look like this!
I slid my desks into a "U" shape and rolled the cart between the front two desks of each group.
The basket on top (from the Dollar Tree) holds the students classroom library books 
(they're forbidden from putting the books in their desks to keep them from getting torn up).
The little can (I've just had forever) in front of the basket holds bingo chips.
*More on that behavioral strategy later!

you might wonder. 

There are a host of possibilities, depending on your classroom needs and teaching style.
My tables do a lot of group & interactive activities. As a result, there are a few items that I want the kids to have handy so they aren't wasting time wandering around picking up materials.

Inside my carts, the kids have access to:
Top Drawer: Dictionaries, highlighters, etc. 
Middle Drawer: Netbook, charger, and microfiber wipe (for group research/product creation)
Bottom Drawer: Dry Erase Boards, makers, & erasers (1 set per person). 
*I used clean, lunch meat containers to store the markers and mini-erasers. This prevents them from rolling & clacking every time the drawer is opened.
I'd love to hear what you use rolling carts for!

In the end, I had some nice sized strips of colorful, laminated paper. 
Teachers recycle everything so I had to think of something to create from my leftovers.
I used my paper cutter to slice them into colorful little bookmarks. 
My students can pick these up from the book nook whenever they need to mark their place in a text.
They love the colorful little strips, and I love making the most of everything!

   Have fun getting your room together for a brand-new year!
 photo signature-37.png

Friday, August 1, 2014

Back to School Sale


Ready to get back to business?
Pick up everything you need during the Back to School Sale.
EVERYTHING in my store will be ON SALE!

 photo signature-37.png