Wednesday, October 28, 2015

Spook-tacular Science


Spook-tacular Science
    Last year I found the coolest Halloween chips at my local grocery store! This year they were back again so I picked up a couple of bags because I knew that they would be a fun segway into my science unit on bones
   These yummy treats were only $2.50 a bag so I picked up a couple for my class. Each student can use the “bones” to create a small skeleton. 


Give each student a sandwich baggie with the following Cheetos:
·       Skull (1)
·       Rig cage (1)
·       Hands/feet (4)
·       Straight bones (6-8)

Ask your students to look at the pieces and create a skeleton.

    Before or after your students make their Cheetos skeletons, show them a short video clip. My favorite site to use for videos is Brain Pop or Brain Pop Jr., but it requires a subscription.  This free video from Make Me Genius is a quick clip that you can also use. 
     I like to let my students try to make their skeleton first. Then we watch the video and I give them a few minutes to move their bones around if needed. This allows them to reflect on their learning and empowers them to take charge of what they know.


      After we do our intro activity, we discuss the science unit that we’re about to begin. You can do a quick class KWL chart about the skeletal system; ask your students to write a list of skeletal system facts that they know; or give students a sticky note to write one thing/question that they’d like to learn. There’s no limit to the quickie wrap up activities that you can do.
     I even channeled my inner “Miss Frizzle” for my bone unit! This outfit was super-simple to make. I just traced bone patterns onto white felt with a black sharpie. Then I cut them out and used small safety pins to a black sweat suit. And yes, I sprayed my hair orange with clearance Halloween hair spray!


Check out my TpT packs for more skeletal system ideas!
Shake, Rattle, & Roll Skeleton Scavenger Hunt

My Body Machine

Strange but True: Human Body

No Bare Bones Research Writing

Thanks for stopping by!
  photo signature-37.png

Monday, June 22, 2015

Super Summer Fun!

Super Summer Fun!
    The sun’s out and so is school. It’s the perfect time of year to get outside for some super summer fun! Check out these perfect projects from some fantastic blogs

summer reading teepee
from Tater Tots and Jello
       My kids love to read! In fact, sometimes I have trouble getting their noses out of their books and into the great outdoors.  Creating a reading teepee is brilliant idea to get my little bookworms out in the fresh air. The teepee can also be used as an outdoor clubhouse for the kiddies. There are so many ways your kids can get tons of fun out of this idea!


069
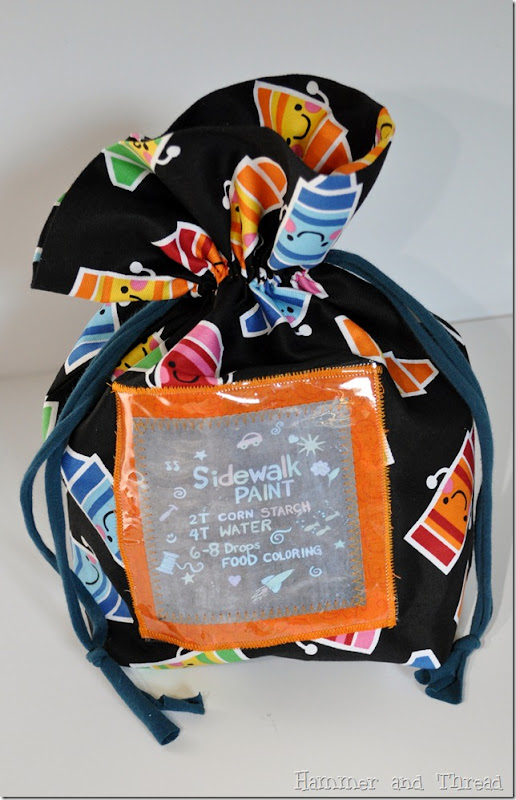
from Hammer and Thread
    What child doesn’t love decorating their driveway with swirls of color? Sidewalk chalk is a great way to let your kiddies’ creative juices run wild! This site helps make it fun and inexpensive


from Gwenny Penny
   Another childhood favorite is BUBBLES! Seriously, my little stinkers love chasing those elusive orbs as they drift on the wind. To make the bubbles even more fun, try creating your own bubble wands from items around the house...

http://lessonplans.craftgossip.com/bubble-wand/2014/08/24                
Mommies With Cents


from Art is Basic
    To make your bubble play even more fun, try adding a little color to create art prints! Obviously, you won’t want to chase these bubbles around the yard (unless you’re trying to tie-dye your clothes).   


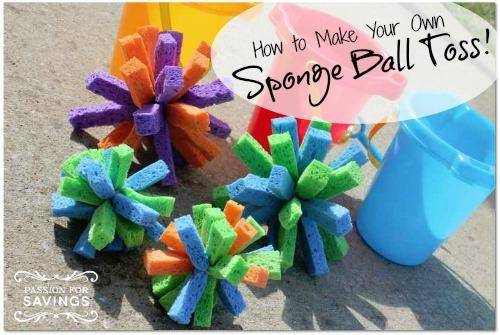
http://www.passionforsavings.com/2013/05/how-to-make-your-own-sponge-ball-toss/
from Passion For Savings
   This project is the perfect way for the kids to cool off on a hot summer day without a visit to the pool! Once you create these sponge balls with your children, they can reuse them all summer long. They also make fun pool toys if your kids want to add some sport to their swim time.


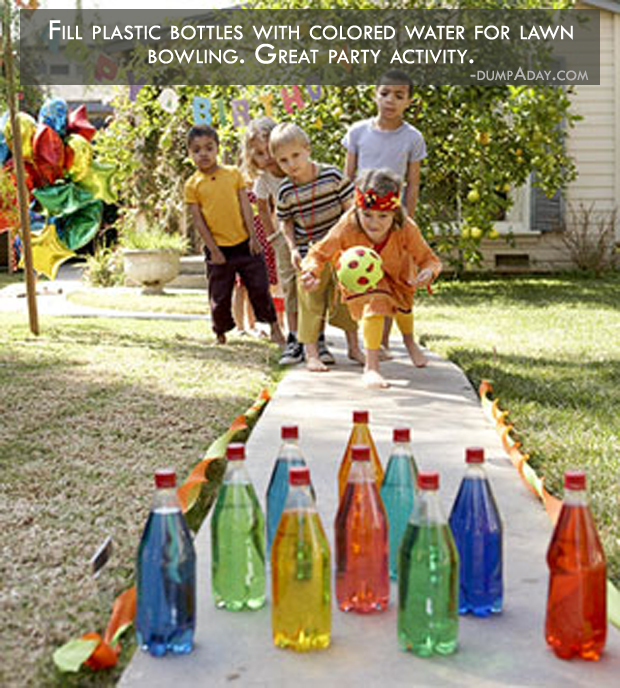
http://www.dumpaday.com/genius-ideas-2/fun-ideas-for-the-kids-this-summer-22-pics/
from Dump a Day
      One of the innovative summer games on this site is bottle bowling. It’s practically free and teaches your kids to recycle items from home! This site also contains other great games that would be awesome party activities or just plain summer excitement.

Enjoy the fresh air and time with your kiddos this summer!

Thanks for Stopping By,
 photo signature-37.png

Sunday, May 17, 2015

Interactive Notebook-Mini: Plants and Soil

Here it is! My newest interactive notebook...
 
I have to admit that creating all the little foldables and flipbooks is slightly addictive.
This week I was feeling froggy and even started some math notebooks for next year!

But before I switch subjects, let me show you some of the fun plant and soil activities inside this notebook

  • There is a cut and assemble plant parts diagram with labels
  •  Vocabulary flappers AND puzzles (so you can choose your favorite format)
  • Foldables for the functions of plant parts
  •  The needs of plants
  •  The lifecycle of plants (this is one of my favs)
  •  Plant experiments with writing extensions

AND fun soil components as well!

  • Properties of soil
  • What’s in soil
  • Layers of soil
  • AND two soil experiments with writing extensions

 Visit my TpT store by clicking on any of the images to download 
this handy helper for teaching plants and soil.

Enjoy and thanks for stopping by,
 photo signature-37.png

Monday, April 20, 2015

Interactive Notebook Mini

For the last several years, I’ve been working with interactive notebooks in my classroom. They’ve gradually transformed into interactive tools that have increased student engagement in content areas. If you’re just getting started with notebooks, try choosing one content area to start with. Then begin adding in additional content as you become more confident with the format.
   Originally I began using interactive notebooks for math. These skills seemed to be some of the easier topics to transition into interactive notebooks. That same year I also began notebooking for reading. My students really enjoyed this new format and it freed us from the dusty, old textbooks (that were falling apart anyway). Then last year I integrated our science content into interactive notebooks as well.

   Science is one of my favorite subjects to teach because it offers so many opportunities to do hands-on learning. It’s also a fantastic vehicle to integrate other content areas into. We frequently use science as a segway for writing projects!  In order to facilitate interactive notebooks for science, I began creating notebook-minis. These are interactive notebooks geared specifically to one particular topic. By using notebook-minis I can pull the exact skills I want to work on with my students. 

Check out my very first science notebook-mini...

This notebook includes directions with photo samples of each activity, activity directions, and technology links to enhance your science curriculum


To download this notebook-mini, click on one of the photos...


Stay tuned for my next Plants & Soil notebook-mini! 


Enjoy and thanks for stopping by!
 photo signature-37.png

Thursday, April 9, 2015

Easy Easter Cupcakes


       Nothing screams “Easter’s coming” like the store shelves filled with rainbow-hued Peeps®. If your kids are like mine, then they love these squishy marshmallow critters. This year I thought it would be fun to make some Peep® inspired Easter cupcakes to take to school (just be sure to pass them out at the END of the day so your students get their sugar-shock at home ;D). Even if you’re not a cupcake master, you can make these easy Easter cupcakes!

Here’s what you’ll need:

Ingredients
·      1 box cake mix (and the required ingredients)
·      1 can of vanilla frosting
·      1 package of neon gel food coloring
·      1 package of cupcake liners
·      3 boxes of Peeps (any colors will do)
                   

Materials
·      mixing bowl
·      1 cupcake pan
·      Mixer (or whisk, if you’re ready to work out your arms)
·      Oven
·      Freezer Ziploc bags

·      Scissors/toothpicks

   Now that you have everything you need, it’s time to whip out these tasty holiday creations!

Directions
1.    Prepare the cupcake mix per the box directions (*If you want a more homemade texture, then substitute 1 c. of buttermilk for the water the box calls for).
2.    While the cupcakes are cooking, prep your frosting. Add the neon green food coloring to your white frosting, and stir it up with a butter knife (*for thicker frosting, add a little powder sugar).
3.   Prep your Ziploc freezer bags to use as piping bags for your frosting (I use cake tips because I make all my kids’ birthday cakes, but this works in a pinch): For squiggly, grass-like frosting, poke the bottom corner of the bag with toothpicks. You should have multiple holes, but be careful not to add too many or your bag will blow out. For the regular, textured-spirals, cut a “W” in the bottom corner of the bag. *Remember the larger your hole, the more frosting will squeeze out at once!
4.  Place your Ziploc bags in a tall glass cup with the top open. Use a butter knife to add the frosting to the bag. *Try to squeeze it toward the bottom of the bag to prevent air pockets (which will also make frosting blow-outs).
5.   Set the frosting in the refrigerator until you’re ready to ice the cupcakes.  
6.   Cool the cupcakes completely.
7.   Grab your frosting bag and squeeze squiggly grass, or make swirls on top of the frosting to create a “grassy patch”.

OR...


8.   Add a Peep to the “grass”
9.   Take the Peeps to school and watch your students’ eyes light up with cupcake delight!

       I’d love to hear how you celebrate Easter in your classroom! Feel free to leave a comment and share your ideas for others to enjoy, or let me know how your cupcakes turned out.

Thanks for stopping by!
See you soon,
 photo signature-37.png

Thursday, March 26, 2015

Persuasive Writing with Alternate Energy


This year I was determined to streamline my workload by integrating different skills as much as possible. I also really believe that most students are more engaged in the content when you take more of a project approach to teaching instead of segmenting everything into unrelated chunks. With that thought in mind, I started brainstorming ways to blend my writing requirements with the various content areas.

     Science is one of my favorite subjects to teach because it allows so much exploration for the kids. However, it is frequently brushed aside as a less important subject (at least until it becomes tested). But, I decided that it would be the perfect vehicle to engage students in some serious writing! Once my students were excited about the topic, it was much less torturous to convince them that writing about their learning would be fun too.
     This quarter we’ve been learning about Force & Motion and States of Matter. My students have done lots of hands-on experiments and interactive notebooking on the topics so I felt that they were ready to apply that learning in a writing piece. 
I challenged them to choose an alternate energy and then write a persuasive writing piece that would convince someone else to use that form of energy. Since my kiddos are in third grade we limited our choices to solar, wind, or water energy, but older students could easily add more energy sources.


HOW TO FOLD YOUR GRAPHIC ORGANIZER
(sure you could print a cutesy one, but this will save your copies)

STEP#1: Fold it in half

STEP#2: Write your alternate energy on the left

STEP#3: Fold it in half (lengthwise)

STEP#4: Fold it in half (lengthwise) AGAIN

TA-DA!!

STEP#5: Open it up and add the heading 
"Reasons why someone should use _______ energy"
(on the right side)


STEP#6: Let your students work with a partner to brainstorm at least three reasons to justify their argument that their alternate energy is the best.

STEP#8: Model how to write a persuasive opening paragraph. Let the students add their opening paragraph to the RIGHT side of their graphic organizer.


STEP#9: Model (if needed) how to turn the information from the graphic organizer 
to a paragraph format with a snazzy title.
I like to use alliteration in my titles!


  I hope you enjoyed this quickie writing activity to coordinate with your science content!

Thanks for stopping by,

 photo signature-37.png
PS. Just a little secret... I'm putting all the interactive notebook items that I've been creating for the last two years into downloadable files for you! They will be interactive notebook-minis so you can choose the topics you want without paying a fortune for giant files that you really don't need. Follow me on TPT to get the update when these are available!


Sunday, March 15, 2015

I Know Biographies

I Know Biographies


     Kids think they know a lot of things everything, in fact!  But one thing that they don’t know much about is historical figures. Sadly, most students seem to think that history is boring and irrelevant to their lives, but they couldn’t be more wrong. History shaped our countries, founded our nations, and made us who we are as a people. I LOVE introducing my students to the fascinating people of our past!

    Usually we jump back in time to begin biographies in February. It’s Black History and Women’s History month! Double the opportunity to excite your students about famous figures. I always begin with some short biographies and video clips of important people from various time periods and careers. Brain Pop is one of my favorite places to find video clips, although there are also a good variety of them on YouTube if you have time to look through the search results.


   My “I Know Biographies” pack is also a great tool to introduce your students to short biographies. Each page has the biography of a different famous figure from various periods of time. Besides getting interested in historical people, your students can also practice finding information in non-fiction texts.


After we spend a little time getting to know a few people, then we begin our research project. Not only do I enjoy getting the kiddos excited to learn about important people of the past, but I also like to get the kids writing about them. First I take my students to the school library to meet some very helpful research tools: the encyclopedias and biographies. After they wander through the biographies, my students choose a famous figure that they would like to learn more about. Most of my students will choose a biography to take with them while we’re there.
   Our next mini-lesson is about how to use the encyclopedias. I do a lot of modeling how to find their famous figure inside the volumes. You can also relate the structure of the encyclopedia to a dictionary (using guide words and ABC order). As we’re researching our historical persons, my students use graphic organizers to record notes.
  We also do a lesson on internet research. There are some free online encyclopedias and a host of weblinks for most famous figures (although I try to discourage my students from choosing any current celebrities due to questionable content online and/or difficulty finding reliable information). These are a few of my favorites: 


Image result for Biography.com images


   These are my graphic organizers...


click on the images to download these for FREE!

   If you'd like a biographical set focused on Black History, try my "Follow the Freedom Trail Black History" pack from TpT. It has several biographical activities for famous African Americans.
Follow the Freedom Trail: Black History Pack


  I hope you enjoy these resources and your students enjoy traveling back in time to meet some famous historical figures!


Thanks for stopping by,
 photo signature-37.png