Take a ramble around my room...
This is my favorite spot in my classroom! Growing up, one of my favorite places to go was the local library. It was so peaceful and perfect. It was a world filled with characters I couldn't wait to befriend and places that I never knew that I always dreamed of visiting. Even now I love the smell of old books and the excitement of breaking open the boxes of new book orders.
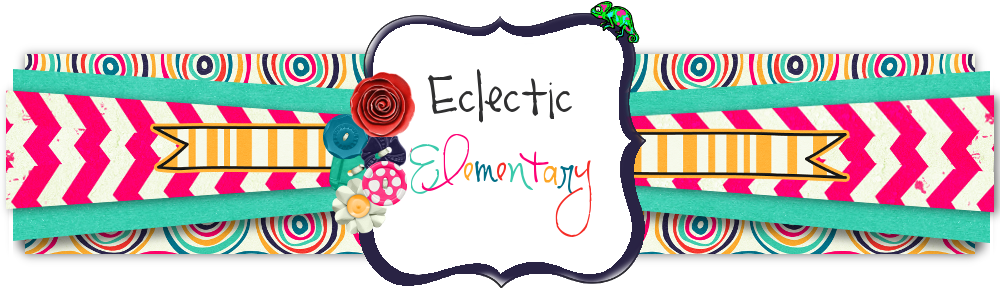
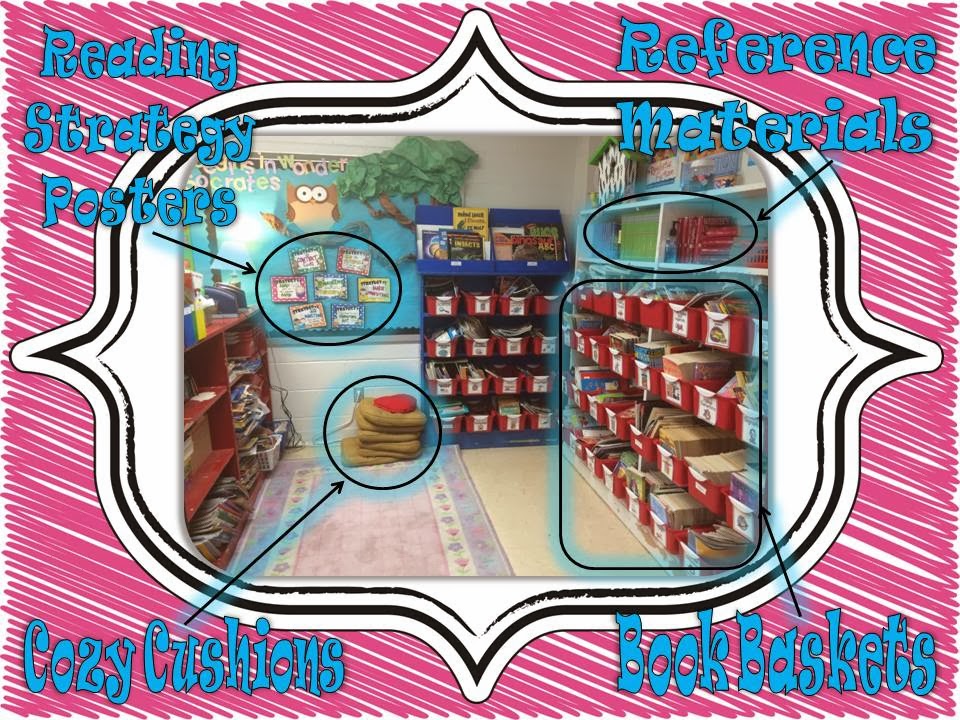
We spend a LOT of time learning reading strategies and how to use them to help us understand text. These little mini-posters are eye-catching and colorful. They provide visual cues for students while they're reading. We also add these strategies to our reading notebooks so students can revisit them as needed.
Click on the picture to download my "Reading is Thinking" mini-posters!
Parents and students always seem surprised to see a reading rug and cushions in my room when they come to our first Open House. While my room is very compact, I still try to keep a little space open for cozy reading. My class reads around the room everyday. Students need a relaxing space where they can learn to really enjoy reading. I want my students to look forward to their chance to pick up a book and wander through its pages, so I try to make this part of our day as inviting as possible.
By the middle of the year, I have a little bit of a love/hate relationship with my classroom library. The shelves on the right are all fiction buckets, sorted by genre. The books on the other shelf are all non-fiction, with two cardboard shelves which hold over-sized texts.
My students have really been engaging in reading but haven't learned all the genres extremely well. As a result, many of my books have become long lost friends, misplaced in the wrong buckets. To help alleviate this issue, two of my students are always class librarians. Their job is to check the book baskets for books in the wrong spots. This makes the whole system more manageable. I've also tried adding stickers to the books that match each bucket. Recently I found an app that you can use to scan your class library books. I haven't finished cataloging my entire collection (this is only about 1/2 of my books!) but I'm hoping that this will be a handy tool.
Keeping reference materials within student reach gives them a sense of independence. After teaching them how to use dictionaries and thesauruses, students can find word meanings independently. We also have a small set of grammar skill-builder books which students can borrow during independent reading and/or small groups.
This is the first area you see when you come into my room. It's an eclectic blend of colors (mostly because I've had to mesh the furniture that I inherited in my room with the organizational items I've found at home) and styles, just like me and my students!
The short wall you see is really the back of my low-standing bookshelf which holds my small group book sets. It was plain and ugly so I dressed it up with a lavender, gingham-print curtain panel (this was recycled from my daughters' room; they've moved on to animal print). I attached the edges of the panel with staples.
Something else that dresses up my classroom:
My son LOVES these books! When he finishes a one, I take the book to school and let my class enjoy them. The books are great discussion starters so they became a natural
springboard for argumentative writing.
I choose a "would you rather" from a book and write one choice on each speech bubble with a Vis-A-Vis marker (which is tied to a piece of yarn hanging on a push pin next to the board). The students place their owl magnet on the magnet strip next to the choice they would rather pick. Then, they can discuss their choices with their small groups, and then write to explain why they made their choice which allows them to learn how to justify their decision.
Just a word to the wise: if you decide to make your own interactive board, use flat magnets for the base magnets. I used magnet tape this year and it curls badly. I've had to use superglue to keep it from peeling up. Next year I plan to use the flat magnets instead.
The adorable kiddie clipart is by Scrappin' Doodles.
Click on my Scrappin Doodles icon to find more great clipart.
Keep your classroom organized with easy access storage units. The two base drawers (yellow) used to hold my son's toys. Now they hold graded work (that's ready to be returned to my students) and papers with no names (this seems to be a skill that some students struggle with ALL year). When a student is missing an assignment, he/she can check the "No Name Papers" drawer.
The three-drawer unit on top of the base drawers houses: extra copies, homework, & classwork. I cut and attached scrapbook paper to the backside of the drawer with double-sided sticky tape. You can use more permanent adhesives but I like to have the option to change the inserts to match my changing decor.
Next to my drawer units, is a bin organizer. This year it holds extra office supplies such as: notebook paper, glue, scissors, markers, crayons, colored pencils, and highlighters. It also holds our dry-erase markers, boards, and erasers. I found this one at Target but they're available in a variety of places and stores (My hubby & I originally bought this for my daughters' bedroom).