Friday, August 5, 2016

Back to School Procedures

Back to School!
   It’s that time of year again. All the school supplies are filling the store shelves. You find yourself simultaneously loathing the retailer and desperately wanting to rush through the isles before the supplies are picked over. Does anyone else LOVE the smell of new crayons or is it just me???
   Even though I have a few more weeks until my munchkins start school, my mind is already reeving up for that first week of school. I drive myself bonkers running through lists of things I need to do: visit the teacher supply store (for cute room décor I don’t really need); revise my first week of lesson plans; copy all my materials; print all my labels (because I’m OCD about organizing); rework my furniture arrangement for maximum efficiency; figure out where to stash all the new, used student books on my overflowing library shelves the list goes on and on!

    One of the most important things I always make sure I do at the beginning of the year is to have a plan to teach procedures to my munchkins. Everyone’s heard it a million times and it sounds like something so simple, but it can make or break your entire year. This past year I had first-hand experience with this My fourth baby arrived just in time to send me out on maternity leave before school started. As a result, my class started the year out with a (fantastic!) substitute teacher. When I arrived back on the scene just before Christmas Break, my class was running smoothly so I just jumped in and hit the curriculum hard. Pretty quickly though, it became a struggle to do some of the things that I routinely implemented in my room, like Literacy Stations.
   The groups didn’t always get along. Some of the kids couldn’t complete their stations without interrupting my guided reading group eight million times (ok. It was probably 4-5 times, but it felt like that much!). Other kids were off-task or disruptively loud while they worked. After a couple of weeks, my stress level was going through the roof and I wasn’t really sure if the stations were really as effective as I had planned.
   I was wracking my brain trying to figure out what had gone wrong. Were the kids just crazier than normal? It seemed like it. Were my raging post-pregnancy hormones making me nuts? Probably. Then, I finally realized it was because we hadn’t done our classroom procedures together. Yes, we had practiced the Literacy Station procedures and activities together for a couple of weeks, but somehow something hadn’t clicked. Looking back I’m convinced it was those first crucial weeks of school that my students and I never got together.
   This year that will change. The beginning of the year is always busy with rules and routines but I’ve tried to simplify for success this fall. This year we’re starting off right, and staying that way! I created Pencil Pouch Procedures books for my kiddos. It has been formatted specifically to fit in the lid of a standard, plastic pencil box. Each page has a particular set of rules or procedures that I want my students to learn and use fluently. We will do mini-lessons on each topic and then the students will complete the corresponding page. Once my students have completed their entire book, they will store them in the top of their pencil boxes (or in their pencil pouches). Then they can access their Pencil Pouch Procedures Book if they have a question about a classroom, or school, rule or procedure. This will help eliminate some of the repetitive questions the kids always ask and reinforce what I want them to do. The Pencil Pouch Procedures Books are simple and easy to use. No prep. Low stress. That’s how to start the year off right! If you want to see more of this handy resource, click on the image below to visit my TpT store!
 photo signature-37.png


Friday, April 22, 2016

Earth Day Everyday


     Once a year, when Earth Day rolls around, most of us go out of our way to celebrate the Earth. It’s the perfect opportunity to share the wonders of nature. It also gives us the chance to share how to care for our planet with our kids. But, we can celebrate Earth Day every day!
    Inside this pack you’ll find a variety of low-prep Earth Day activities and printables. You can also find some ideas for celebrating our amazing planet all year around. Students should understand that taking care of our world is an important responsibility. One they can begin no matter how old they are. It’s an awesome privilege to look after the world that looks after us so well!
 Sharpen your students’ math skills by using area and perimeter to make Earth Day gardens. Review mixed math skills with these Earth Day themed story problems. Help your students think of ways that they can use helping hands to make our planet a better place. Read about the origins of Earth Day in an informational text with short answer comprehension questions. Create an Everyday Earth Day book about ways they can celebrate this special holiday at home and in the world around them. Dig through the ABCs to create tips to help the Earth in Earth Day A to Z. Collect data, create graphs, and summarize your findings to share how well your students recycle at home. Empower your students to become planet protectors with some activity ideas that they can complete at home.

This download includes:
Earth Day Area & Perimeter
Planted Perimeter
Earth Day Oops! (mixed story problems)
Helping Hands (lending a hand to help the planet)
Earth Day Origins (reading comprehension-informational text)
Everyday Earth Day shape book (writing)
Earth Day A to Z (writing- ABC book of Earth Day tips)
Regular Recycling (math graphing activity and booklet: tally chart, pictograph, line graph, pie chart, and line graph with writing extension)
Planet Protectors (at home activities for students) 
Happy Earth Day (color sheet)
We Recycle (color sheet)
Ponder Plants (nature walk lesson w/observation sheets)
Recycle Sort (categorizing recyclables)

   I hope you find this pack helpful and fun for your kiddos. Thank you for making the Earth a priority in your classroom!

Enjoy these recycling videos with your peeps..


 photo signature-37.png

Wednesday, January 20, 2016

Wednesday, January 6, 2016

Everyday Eclectic: Super, Simple Chicken Dinner

      If you’re like me, when you get home from work the last thing you want to do is cook a huge meal. I’ve found a super simple way to make QUICK and EASY meals instead of eating pre-packaged frozen or fast food.  It saves money, time, and it’s actually healthy!   
   Are you ready for my secret?
   FREEZER BAGS. That’s right, freezer bags have changed our family meal time.
    Last year I started buying fresh boneless skinless chicken breasts at our local Sam’s Club store. Obviously my family couldn’t eat an entire flat of chicken in one setting so I needed a way to utilize the rest of the value priced meat. That’s where freezer bags came in
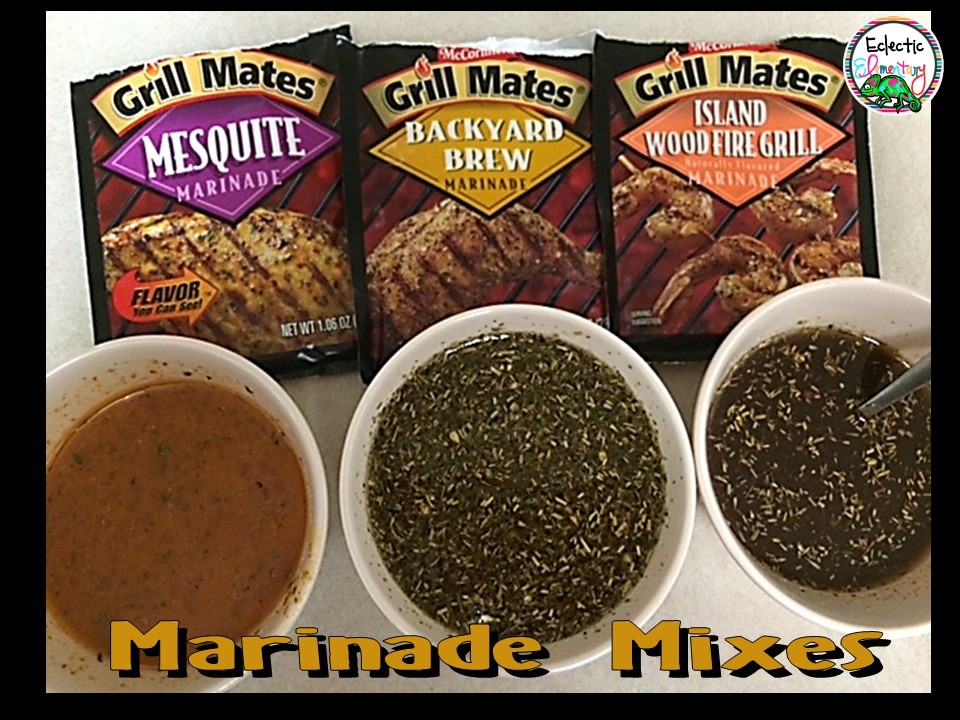
   At first I just froze the extra. But when we defrosted the chicken it was usually a little dry, or just plain boring. I rummaged around in my cabinets and came across some marinade packets that we had bought for grilling. It was like lightning struck my brain! I’m sure I heard angels singing as I looked between those dry marinade packets and that pile of poultry.
     Are you ready to get started on your super, simple chicken dinner? Just grab a few items and get going.

   
Materials:
Large Knife
Cutting Board
Spoon
Gallon Freezer Bags
Sharpie

Ingredients:
Boneless Skinless Chicken Breasts
Marinade Packets
Oil
Vinegar (white or apple cider)
                                                    Water 


Step 1: Prep your space
  • ·      Get out (AND OPEN) 1 bag per 1-1.5 lbs. of chicken *Trust me, you do not want to open these with chicken juice all over your hands!
  • ·      Use a sharpie to label your freezer bags (write the name of one marinade on each bag)
  • ·      Set out your cutting board and knife
  • ·      Pull out the marinade packets and other ingredients (*different marinade packets require slight variations of additional ingredients, but water, oil, and vinegar are standard)


Step 2: Mix your marinades
  • ·      Mix each marinade in a small bowl
  • ·      Set the marinade packet for each mix in front of the bowl


Step 3: Put it together
  • ·      Butterfly cut each chicken breast (cut it horizontally to make thinner cutlets)
  • ·      Place 3-4 chicken breasts into each gallon freezer bag
  • ·      Pour one marinade over each bag of poultry
  • ·      Squeeze out as much air as possible and zip the bag shut
  • ·      Lay the bags flat in the freezer

Now comes the best part!

      When you’re ready to make your super, simple chicken dinner, pull the Ziploc bag out of the freezer. Set it in a large bowl (or your clean, kitchen sink) and run warm tap water over it. I let it sit in the water while I change out of my work clothes and into my p.j. pants and fluffy slippers. Dinner’s well under way while I’m already starting to relax! 
     When the chicken has thawed, flip on your grill. While the grill pre-heats, put on some fast-fix sides. We like to microwave baked potatoes and toss a quick side salad or heat up some canned veggies (don't groan-at least they're vegetables!).


     Grill your chicken (or ask your spouse to cook the meat if you really want a nice break). Fixing our chicken this way really lets the marinades saturate the meat for a flavorful dish. Plate your chicken and simple sides and serve.  


Sometimes we have extra chicken left over that is terrific for chicken roll-ups, chicken salads, and chicken nachos! YUM!!
I hope this super, simple chicken dinner idea gives you a little more time to unwind in the evening! Feel free to leave an idea or comment of your own. J
 photo signature-37.png

Wednesday, October 28, 2015

Spook-tacular Science


Spook-tacular Science
    Last year I found the coolest Halloween chips at my local grocery store! This year they were back again so I picked up a couple of bags because I knew that they would be a fun segway into my science unit on bones
   These yummy treats were only $2.50 a bag so I picked up a couple for my class. Each student can use the “bones” to create a small skeleton. 


Give each student a sandwich baggie with the following Cheetos:
·       Skull (1)
·       Rig cage (1)
·       Hands/feet (4)
·       Straight bones (6-8)

Ask your students to look at the pieces and create a skeleton.

    Before or after your students make their Cheetos skeletons, show them a short video clip. My favorite site to use for videos is Brain Pop or Brain Pop Jr., but it requires a subscription.  This free video from Make Me Genius is a quick clip that you can also use. 
     I like to let my students try to make their skeleton first. Then we watch the video and I give them a few minutes to move their bones around if needed. This allows them to reflect on their learning and empowers them to take charge of what they know.


      After we do our intro activity, we discuss the science unit that we’re about to begin. You can do a quick class KWL chart about the skeletal system; ask your students to write a list of skeletal system facts that they know; or give students a sticky note to write one thing/question that they’d like to learn. There’s no limit to the quickie wrap up activities that you can do.
     I even channeled my inner “Miss Frizzle” for my bone unit! This outfit was super-simple to make. I just traced bone patterns onto white felt with a black sharpie. Then I cut them out and used small safety pins to a black sweat suit. And yes, I sprayed my hair orange with clearance Halloween hair spray!


Check out my TpT packs for more skeletal system ideas!
Shake, Rattle, & Roll Skeleton Scavenger Hunt

My Body Machine

Strange but True: Human Body

No Bare Bones Research Writing

Thanks for stopping by!
  photo signature-37.png

Monday, June 22, 2015

Super Summer Fun!

Super Summer Fun!
    The sun’s out and so is school. It’s the perfect time of year to get outside for some super summer fun! Check out these perfect projects from some fantastic blogs

summer reading teepee
from Tater Tots and Jello
       My kids love to read! In fact, sometimes I have trouble getting their noses out of their books and into the great outdoors.  Creating a reading teepee is brilliant idea to get my little bookworms out in the fresh air. The teepee can also be used as an outdoor clubhouse for the kiddies. There are so many ways your kids can get tons of fun out of this idea!


069
from Hammer and Thread
    What child doesn’t love decorating their driveway with swirls of color? Sidewalk chalk is a great way to let your kiddies’ creative juices run wild! This site helps make it fun and inexpensive


from Gwenny Penny
   Another childhood favorite is BUBBLES! Seriously, my little stinkers love chasing those elusive orbs as they drift on the wind. To make the bubbles even more fun, try creating your own bubble wands from items around the house...

http://lessonplans.craftgossip.com/bubble-wand/2014/08/24                
Mommies With Cents


from Art is Basic
    To make your bubble play even more fun, try adding a little color to create art prints! Obviously, you won’t want to chase these bubbles around the yard (unless you’re trying to tie-dye your clothes).   


http://www.passionforsavings.com/2013/05/how-to-make-your-own-sponge-ball-toss/
from Passion For Savings
   This project is the perfect way for the kids to cool off on a hot summer day without a visit to the pool! Once you create these sponge balls with your children, they can reuse them all summer long. They also make fun pool toys if your kids want to add some sport to their swim time.


http://www.dumpaday.com/genius-ideas-2/fun-ideas-for-the-kids-this-summer-22-pics/
from Dump a Day
      One of the innovative summer games on this site is bottle bowling. It’s practically free and teaches your kids to recycle items from home! This site also contains other great games that would be awesome party activities or just plain summer excitement.

Enjoy the fresh air and time with your kiddos this summer!

Thanks for Stopping By,
 photo signature-37.png

Sunday, May 17, 2015

Interactive Notebook-Mini: Plants and Soil

Here it is! My newest interactive notebook...
 
I have to admit that creating all the little foldables and flipbooks is slightly addictive.
This week I was feeling froggy and even started some math notebooks for next year!

But before I switch subjects, let me show you some of the fun plant and soil activities inside this notebook

  • There is a cut and assemble plant parts diagram with labels
  •  Vocabulary flappers AND puzzles (so you can choose your favorite format)
  • Foldables for the functions of plant parts
  •  The needs of plants
  •  The lifecycle of plants (this is one of my favs)
  •  Plant experiments with writing extensions

AND fun soil components as well!

  • Properties of soil
  • What’s in soil
  • Layers of soil
  • AND two soil experiments with writing extensions

 Visit my TpT store by clicking on any of the images to download 
this handy helper for teaching plants and soil.

Enjoy and thanks for stopping by,
 photo signature-37.png